Snapzy에서 클라우드 저장소 설정하는 방법
Snapzy에서 클라우드 저장소 설정하는 방법 ☁️
Snapzy의 클라우드 저장소 기능을 사용하면 스크린샷을 자신의 클라우드 버킷에 자동으로 업로드하고 즉시 클립보드에 공유 가능한 링크를 복사할 수 있습니다. 서드파티 이미지 호스팅이 아닌 — 데이터는 오롯이 여러분의 것입니다.
이 가이드에서는 AWS S3 또는 Cloudflare R2를 클라우드 공급자로 구성하는 방법을 안내합니다.
사전 준비 사항
시작하기 전에 다음을 확인하세요:
- **Snapzy v1.4.0+**가 Mac에 설치되어 있어야 합니다
- AWS 계정 (S3용) 또는 Cloudflare 계정 (R2용)
- 공개 읽기 접근이 설정된 버킷 (또는 사용자 지정 도메인)이 있어야 업로드된 파일이 URL로 접근 가능합니다
옵션 A: AWS S3 설정
1단계 — S3 버킷 생성
- AWS 관리 콘솔에 로그인하세요
- 버킷 생성을 클릭하세요
- 버킷 이름을 입력하세요 (예:
my-snapzy-uploads) - 리전을 선택하세요 (예:
us-east-1) - "모든 퍼블릭 액세스 차단"을 해제하세요 — 공유 가능한 링크를 위해 공개 읽기 접근이 필요합니다
- 버킷 생성을 클릭하세요
팁: 전체 버킷을 공개로 만들기 원치 않으신다면, CloudFront 배포 또는 사용자 지정 도메인과 함께 서명된 URL을 대신 사용할 수 있습니다.
2단계 — 버킷 정책 설정
snapzy/ 접두사에 대한 공개 읽기 접근을 허용하도록 다음 버킷 정책을 추가하세요:
{
  "Version": "2012-10-17",
  "Statement": [
    {
      "Sid": "PublicReadSnapzy",
      "Effect": "Allow",
      "Principal": "*",
      "Action": "s3:GetObject",
      "Resource": "arn:aws:s3:::YOUR_BUCKET_NAME/snapzy/*"
    }
  ]
}
YOUR_BUCKET_NAME를 실제 버킷 이름으로 교체하세요.
3단계 — IAM 자격 증명 생성
- IAM 콘솔로 이동하세요
- 새 IAM 사용자를 생성하거나 기존 사용자를 사용하세요
- 다음 권한이 포함된 정책을 연결하세요:
{
  "Version": "2012-10-17",
  "Statement": [
    {
      "Effect": "Allow",
      "Action": [
        "s3:PutObject",
        "s3:GetObject",
        "s3:DeleteObject",
        "s3:GetBucketLifecycleConfiguration",
        "s3:PutBucketLifecycleConfiguration",
        "s3:DeleteBucketLifecycleConfiguration",
        "s3:HeadBucket"
      ],
      "Resource": [
        "arn:aws:s3:::YOUR_BUCKET_NAME",
        "arn:aws:s3:::YOUR_BUCKET_NAME/*"
      ]
    }
  ]
}
- 액세스 키 ID 및 비밀 액세스 키를 생성하세요 — 이를 안전하게 저장하세요
4단계 — Snapzy에서 구성
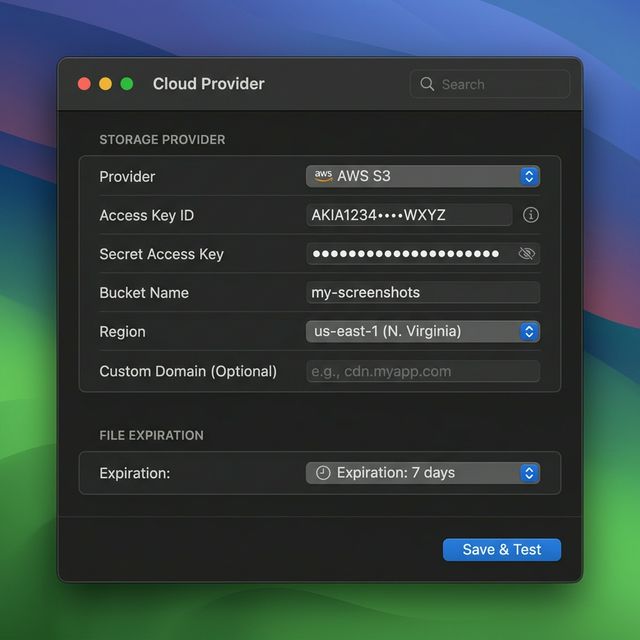
Snapzy를 열고 → 환경 설정 → 클라우드 탭으로 이동해 양식을 작성하세요:
| 필드 | 값 |
|---|---|
| 공급자 | AWS S3 |
| 액세스 키 ID | IAM 액세스 키 |
| 비밀 액세스 키 | IAM 비밀 키 |
| 버킷 이름 | S3 버킷 이름 |
| 리전 | 선택한 리전 (예: us-east-1) |
| 엔드포인트 | 표준 S3의 경우 비워두세요 (또는 S3 호환 서비스의 경우 사용자 지정 엔드포인트 입력) |
| 사용자 지정 도메인 | (선택사항) CloudFront 또는 사용자 지정 도메인 |
저장 및 테스트를 클릭하세요 — Snapzy가 자격 증명을 검증하고 자동 만료를 위한 수명 주기 규칙을 설정합니다.
옵션 B: Cloudflare R2 설정
1단계 — R2 버킷 생성
- Cloudflare 대시보드에 로그인하세요
- 사이드바에서 R2 오브젝트 스토리지로 이동하세요
- 버킷 생성을 클릭하세요
- 버킷 이름을 입력하세요 (예:
snapzy-uploads) - 버킷 생성을 클릭하세요
2단계 — 공개 접근 활성화
업로드된 파일을 URL로 접근 가능하게 하려면 다음 중 하나를 설정하세요:
- R2.dev 하위 도메인 — 버킷 설정에서
r2.dev공개 URL을 활성화하세요 (빠르고 쉬움) - 사용자 지정 도메인 — 설정 → 공개 접근 → 사용자 지정 도메인에서 자신의 도메인을 연결하세요
참고: 프로덕션 환경에서는 사용자 지정 도메인을 권장합니다.
r2.dev하위 도메인에는 속도 제한이 있습니다.
3단계 — API 토큰 생성
- Cloudflare 대시보드에서 R2 오브젝트 스토리지 → 개요로 이동하세요
- R2 API 토큰 관리를 클릭하세요
- API 토큰 생성을 클릭하세요
- 권한을 버킷에 대해 오브젝트 읽기 및 쓰기로 설정하세요
- 액세스 키 ID 및 비밀 액세스 키를 복사하세요
- 계정 ID를 확인하세요 — 엔드포인트 URL에 필요합니다
R2 엔드포인트 형식은 다음과 같습니다:
https://<ACCOUNT_ID>.r2.cloudflarestorage.com
4단계 — Snapzy에서 구성
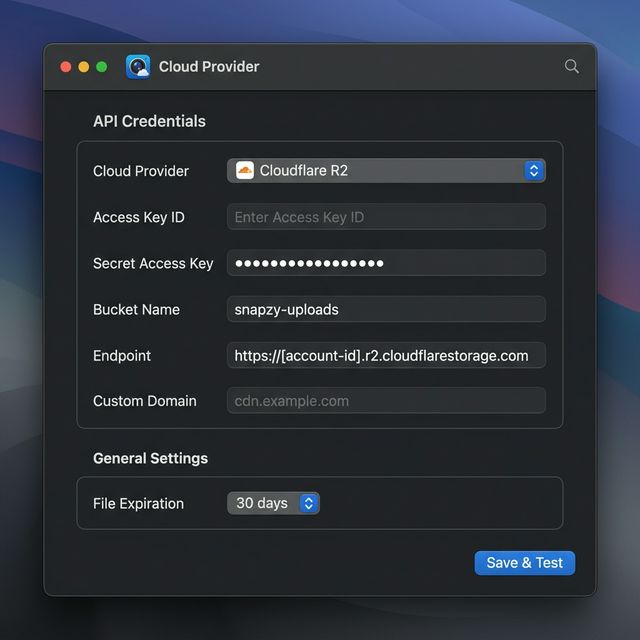
Snapzy를 열고 → 환경 설정 → 클라우드 탭으로 이동해 양식을 작성하세요:
| 필드 | 값 |
|---|---|
| 공급자 | Cloudflare R2 |
| 액세스 키 ID | R2 API 토큰 액세스 키 |
| 비밀 액세스 키 | R2 API 토큰 비밀 키 |
| 버킷 이름 | R2 버킷 이름 |
| 엔드포인트 | https://<ACCOUNT_ID>.r2.cloudflarestorage.com |
| 사용자 지정 도메인 | 공개 접근 도메인 (예: cdn.example.com) |
저장 및 테스트를 클릭하세요 — Snapzy가 연결을 검증하고 수명 주기 규칙을 구성합니다.
파일 만료 구성
Snapzy는 S3/R2 수명 주기 규칙을 사용한 자동 파일 만료를 지원합니다. 다음 중에서 선택할 수 있습니다:
| 기간 | 설명 |
|---|---|
| 1일 | 24시간 후 파일 삭제 |
| 3일 | 임시 공유에 적합 |
| 7일 | 기본값 — 균형 잡힌 보관 기간 |
| 14일 | 2주 기간 |
| 30일 | 1개월 보관 기간 |
| 60 / 90일 | 연장 보관 기간 |
| 영구 | 수동 삭제 전까지 파일 유지 |
중요: 만료 설정을 변경한 후, Snapzy가 자동으로 버킷의 수명 주기 규칙을 업데이트합니다. 클라우드 공급자는 만료 기간 이후 삭제 처리에 최대 24시간이 소요될 수 있습니다.
자동 업로드 활성화
클라우드 저장소를 구성한 후, 자동 업로드를 활성화하세요:
- 환경 설정 → 캡처 후를 엽니다
- 스크린샷 열에서 클라우드에 업로드를 토글합니다
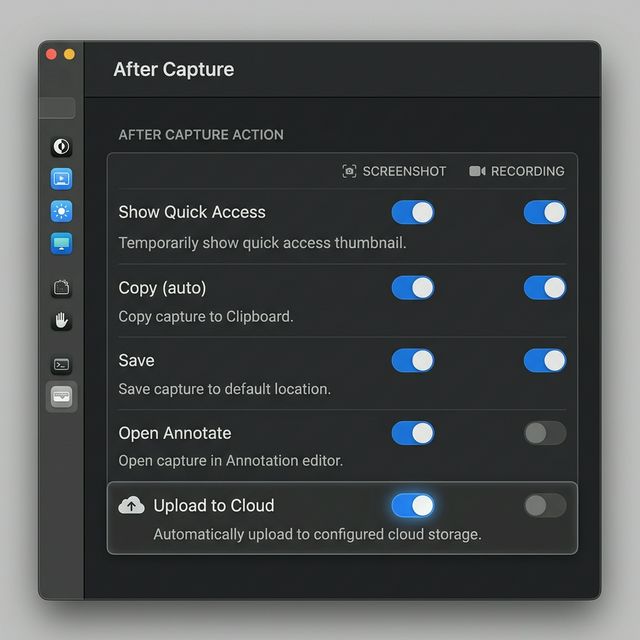
이제 스크린샷을 찍을 때마다 Snapzy가 다음을 수행합니다:
- ✅ 클라우드 버킷에 업로드
- 📋 클립보드에 공개 링크 복사
- 🔗 퀵 액세스 카드에 링크 표시
또는 퀵 액세스 카드나 주석 편집기에서 수동으로 업로드할 수도 있습니다.
업로드 기록
클라우드 업로드 창을 열려면:
- 메뉴 막대에서 Snapzy 아이콘을 클릭하세요
- 클라우드 업로드를 선택하세요 (단축키:
⌘⇧L)
환경 설정 → 단축키에서 이 동작에 대한 사용자 지정 키보드 단축키를 구성할 수도 있습니다.
클라우드 업로드 창은 업로드한 모든 항목을 한눈에 보여줍니다. 도구 모음의 토글을 사용하여 목록 보기와 그리드 보기를 전환할 수 있습니다. 이 창에는 다음도 포함되어 있습니다:
- 검색 — 파일 이름이나 URL로 업로드 항목 찾기
- 필터 — 상태(활성/만료), 공급자, 만료 시간, 정렬 순서로 필터링
- 링크 복사 — 업로드 항목에 마우스를 올리고 복사 아이콘을 클릭해 공개 URL 가져오기
- 브라우저에서 열기 — Safari에서 직접 미리보기
- 삭제 — 개별 파일을 클라우드 저장소에서 제거하거나 전체를 일괄 삭제
- 통계 — 전체 업로드 수를 한눈에 확인
자격 증명 보안
Snapzy는 클라우드 자격 증명을 macOS 키체인에 저장합니다 (평문이 아닙니다). 추가 보안을 위해 보호 비밀번호를 설정할 수 있습니다:
- 클라우드를 처음 구성할 때 비밀번호 설정 안내창이 뜹니다
- 클라우드 자격 증명을 보거나 편집하려면 비밀번호가 필요합니다
- 비밀번호를 잊으셨다면 전체 구성을 재설정할 수 있습니다
Mac을 다른 사람과 공유하신다면 보호 비밀번호 설정을 강력히 권장합니다.
참고 문서
AWS S3
Cloudflare R2
도움이 필요하신가요? GitHub에서 이슈를 열어주세요 — 기꺼이 도와드리겠습니다! 🙌
프로젝트 지원
Snapzy는 무료 오픈소스입니다. 유용하다고 느끼신다면, 개발을 유지하고 모두가 접근할 수 있도록 후원을 고려해 주세요.