Cách Thiết Lập Lưu Trữ Đám Mây Trong Snapzy
Cách Thiết Lập Lưu Trữ Đám Mây Trong Snapzy ☁️
Tính năng lưu trữ đám mây của Snapzy cho phép bạn tự động tải ảnh chụp màn hình lên bucket đám mây của chính mình và tức thì sao chép liên kết chia sẻ vào clipboard. Không có dịch vụ lưu trữ ảnh bên thứ ba — bạn sở hữu dữ liệu của mình.
Hướng dẫn này sẽ đi qua việc cấu hình AWS S3 hoặc Cloudflare R2 làm nhà cung cấp đám mây của bạn.
Yêu Cầu Trước
Trước khi bắt đầu, hãy đảm bảo bạn có:
- Snapzy v1.4.0+ đã cài đặt trên Mac của bạn
- Một tài khoản AWS (cho S3) hoặc tài khoản Cloudflare (cho R2)
- Một bucket đã tạo với quyền truy cập đọc công khai (hoặc một tên miền tùy chỉnh) để các tệp đã tải lên có thể truy cập qua URL
Tùy Chọn A: Thiết Lập AWS S3
Bước 1 — Tạo Bucket S3
- Đăng nhập vào AWS Management Console
- Nhấp Create bucket
- Nhập tên bucket (ví dụ:
my-snapzy-uploads) - Chọn một region (ví dụ:
us-east-1) - Bỏ chọn "Block all public access" — bạn cần quyền đọc công khai cho các liên kết chia sẻ
- Nhấp Create bucket
Mẹo: Nếu bạn không muốn làm toàn bộ bucket công khai, bạn có thể sử dụng phân phối CloudFront hoặc URL có chữ ký với tên miền tùy chỉnh.
Bước 2 — Đặt Bucket Policy
Thêm bucket policy này để cho phép quyền đọc công khai trên tiền tố snapzy/:
{
  "Version": "2012-10-17",
  "Statement": [
    {
      "Sid": "PublicReadSnapzy",
      "Effect": "Allow",
      "Principal": "*",
      "Action": "s3:GetObject",
      "Resource": "arn:aws:s3:::YOUR_BUCKET_NAME/snapzy/*"
    }
  ]
}
Thay YOUR_BUCKET_NAME bằng tên bucket thực tế của bạn.
Bước 3 — Tạo IAM Credentials
- Truy cập IAM Console
- Tạo một ngườ dùng IAM mới hoặc sử dụng một ngườ dùng hiện có
- Gắn một policy với các quyền sau:
{
  "Version": "2012-10-17",
  "Statement": [
    {
      "Effect": "Allow",
      "Action": [
        "s3:PutObject",
        "s3:GetObject",
        "s3:DeleteObject",
        "s3:GetBucketLifecycleConfiguration",
        "s3:PutBucketLifecycleConfiguration",
        "s3:DeleteBucketLifecycleConfiguration",
        "s3:HeadBucket"
      ],
      "Resource": [
        "arn:aws:s3:::YOUR_BUCKET_NAME",
        "arn:aws:s3:::YOUR_BUCKET_NAME/*"
      ]
    }
  ]
}
- Tạo Access Key ID và Secret Access Key — lưu chúng một cách an toàn
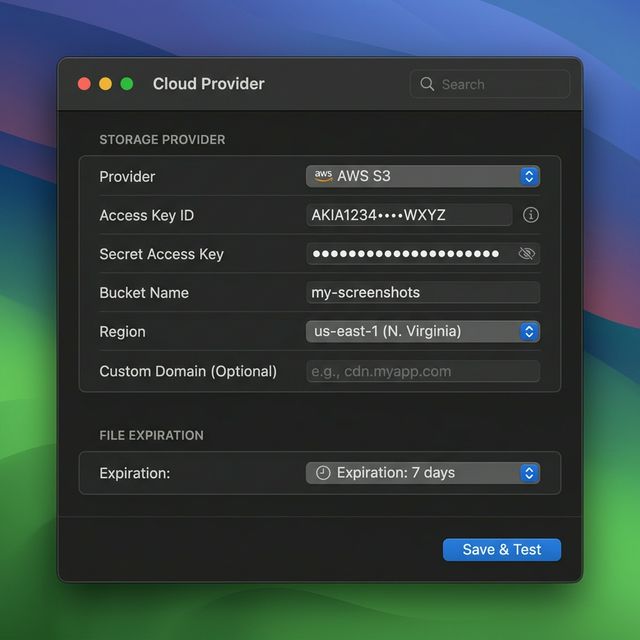
Bước 4 — Cấu Hình Trong Snapzy
Mở Snapzy → Preferences → tab Cloud và điền vào biểu mẫu:
| Trường | Giá Trị |
|---|---|
| Provider | AWS S3 |
| Access Key ID | Khóa truy cập IAM của bạn |
| Secret Access Key | Khóa bí mật IAM của bạn |
| Bucket Name | Tên bucket S3 của bạn |
| Region | Region bạn đã chọn (ví dụ: us-east-1) |
| Endpoint | Để trống cho S3 tiêu chuẩn (hoặc nhập endpoint tùy chỉnh cho các dịch vụ tương thích S3) |
| Custom Domain | (Tùy chọn) Tên miền CloudFront hoặc tùy chỉnh của bạn |
Nhấp Save & Test — Snapzy sẽ xác thực thông tin đăng nhập của bạn và thiết lập quy tắc lifecycle cho tự động hết hạn.
Tùy Chọn B: Thiết Lập Cloudflare R2
Bước 1 — Tạo Bucket R2
- Đăng nhập vào Cloudflare Dashboard
- Đi đến R2 Object Storage trong thanh bên
- Nhấp Create bucket
- Nhập tên bucket (ví dụ:
snapzy-uploads) - Nhấp Create bucket
Bước 2 — Bật Truy Cập Công Khai
Để các tệp đã tải lên có thể truy cập qua URL, bạn cần thiết lập một trong hai:
- R2.dev subdomain — Trong cài đặt bucket, bật URL công khai
r2.dev(nhanh và dễ dàng) - Tên miền tùy chỉnh — Kết nối tên miền của riêng bạn trong Settings → Public access → Custom Domains
Lưu ý: Cho môi trường production, khuyến nghị sử dụng tên miền tùy chỉnh. Subdomain
r2.devcó giới hạn tốc độ.
Bước 3 — Tạo API Tokens
- Trong Cloudflare Dashboard, đi đến R2 Object Storage → Overview
- Nhấp Manage R2 API Tokens
- Nhấp Create API token
- Đặt quyền thành Object Read & Write cho bucket của bạn
- Sao chép Access Key ID và Secret Access Key
- Ghi lại Account ID của bạn — bạn sẽ cần nó cho URL endpoint
Định dạng endpoint R2 của bạn là:
https://<ACCOUNT_ID>.r2.cloudflarestorage.com
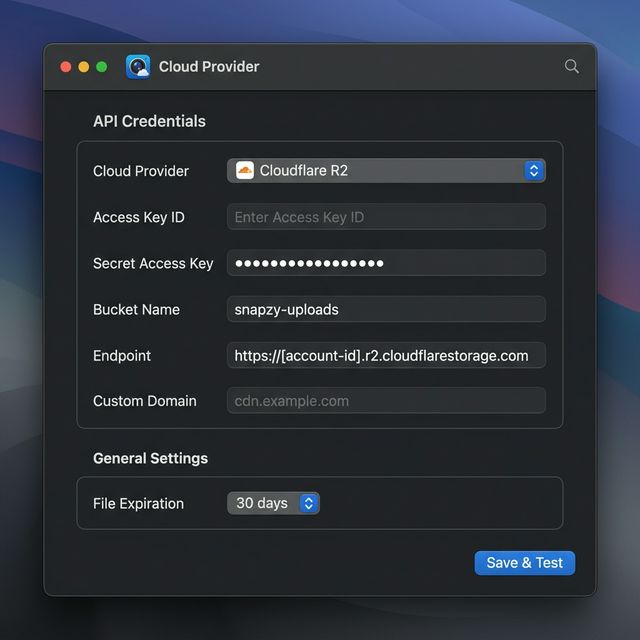
Bước 4 — Cấu Hình Trong Snapzy
Mở Snapzy → Preferences → tab Cloud và điền vào biểu mẫu:
| Trường | Giá Trị |
|---|---|
| Provider | Cloudflare R2 |
| Access Key ID | Khóa truy cập API token R2 của bạn |
| Secret Access Key | Khóa bí mật API token R2 của bạn |
| Bucket Name | Tên bucket R2 của bạn |
| Endpoint | https://<ACCOUNT_ID>.r2.cloudflarestorage.com |
| Custom Domain | Tên miền truy cập công khai của bạn (ví dụ: cdn.example.com) |
Nhấp Save & Test — Snapzy sẽ xác thực kết nối và cấu hình các quy tắc lifecycle.
Cấu Hình Thờ Gian Hết Hạn Tệp
Snapzy hỗ trợ tự động hết hạn tệp bằng quy tắc lifecycle S3/R2. Bạn có thể chọn từ:
| Thờ Gian | Mô Tả |
|---|---|
| 1 ngày | Tệp bị xóa sau 24 giờ |
| 3 ngày | Tốt cho chia sẻ tạm thờ |
| 7 ngày | Mặc định — cân bằng giữa lưu trữ và xóa |
| 14 ngày | Cửa sổ hai tuần |
| 30 ngày | Lưu trữ một tháng |
| 60 / 90 ngày | Lưu trữ mở rộng |
| Vĩnh viễn | Tệp tồn tại cho đến khi xóa thủ công |
Quan trọng: Sau khi thay đổi cài đặt hết hạn, Snapzy tự động cập nhật quy tắc lifecycle trên bucket của bạn. Các nhà cung cấp đám mây có thể mất đến 24 giờ để xử lý việc xóa sau thờ gian hết hạn.
Bật Tự Động Tải Lên
Sau khi lưu trữ đám mây được cấu hình, bật tự động tải lên:
- Mở Preferences → After Capture
- Bật Upload to Cloud trong cột Screenshot
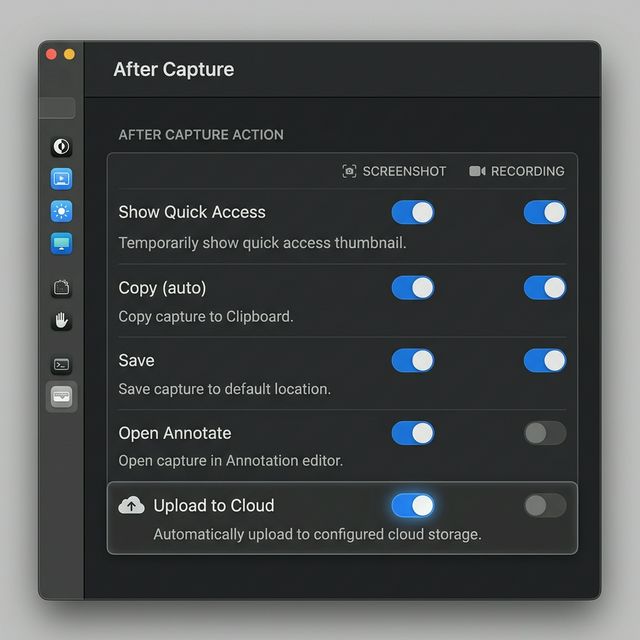
Bây giờ, mỗi khi bạn chụp ảnh màn hình, Snapzy sẽ:
- ✅ Tải lên bucket đám mây của bạn
- 📋 Sao chép liên kết công khai vào clipboard
- 🔗 Hiển thị liên kết trong thẻ Quick Access
Bạn cũng có thể tải lên thủ công từ thẻ Quick Access hoặc trình chỉnh sửa Annotate.
Lịch Sử Tải Lên
Để mở cửa sổ Cloud Uploads:
- Nhấp vào biểu tượng Snapzy trong thanh menu
- Chọn Cloud Uploads (phím tắt:
⌘⇧L)
Bạn cũng có thể cấu hình phím tắt tùy chỉnh cho hành động này trong Preferences → Shortcuts.
Cửa sổ Cloud Uploads cung cấp cho bạn cái nhìn tổng quan đầy đủ về mọi thứ bạn đã tải lên. Bạn có thể chuyển đổi giữa list view và grid view bằng nút chuyển đổi trong thanh công cụ. Cửa sổ cũng bao gồm:
- Tìm kiếm — tìm các bản tải lên theo tên tệp hoặc URL
- Bộ lọc — lọc theo trạng thái (active/expired), nhà cung cấp, thờ gian hết hạn, hoặc thứ tự sắp xếp
- Sao chép liên kết — di chuột qua bất kỳ bản tải lên nào và nhấp vào biểu tượng sao chép để lấy URL công khai
- Mở trong trình duyệt — xem trước bất kỳ bản tải lên nào trực tiếp trong Safari
- Xóa — xóa các tệp riêng lẻ khỏi lưu trữ đám mây, hoặc xóa hàng loạt mọi thứ
- Thống kê — xem tổng số bản tải lên trong nháy mắt
Bảo Mật Thông Tin Đăng Nhập
Snapzy lưu trữ thông tin đăng nhập đám mây của bạn trong macOS Keychain (không phải dạng văn bản thuần). Để bảo mật thêm, bạn có thể đặt mật khẩu bảo vệ:
- Bạn sẽ được nhắc đặt mật khẩu khi lần đầu cấu hình đám mây
- Mật khẩu được yêu cầu để xem hoặc chỉnh sửa thông tin đăng nhập đám mây của bạn
- Nếu bạn quên mật khẩu, bạn có thể đặt lại toàn bộ cấu hình
Chúng tôi khuyến nghị mạnh mẽ đặt mật khẩu bảo vệ nếu Mac của bạn được chia sẻ với ngườ khác.
Tài Liệu Tham Khảo
AWS S3
Cloudflare R2
- Bắt đầu với R2
- Tạo R2 API tokens
- Truy cập công khai (R2.dev)
- Tên miền tùy chỉnh cho R2
- Lifecycle đối tượng
Cần trợ giúp? Mở một issue trên GitHub — chúng tôi rất sẵn lòng giúp đỡ! 🙌
Hỗ trợ dự án
Snapzy miễn phí và mã nguồn mở. Nếu bạn thấy nó hữu ích, hãy cân nhắc tài trợ để giúp duy trì phát triển và tiếp cận với mọi người.