Capture Markup:邊擷取邊標註,無需等待
Capture Markup:邊擷取邊標註
你是否曾經截了一張圖,等待標註編輯器開啟,尋找正確的工具,然後才終於開始畫指向那個 bug 的箭頭?
這個流程我們熟悉到大多數人都接受它「本來就是這樣運作的」。但其實不必如此。
有了 Capture Markup — Snapzy v1.14 的新功能 — 你可以直接在擷取覆蓋層內標註。沒有新視窗。沒有中斷。擷取、畫圖、完成。
那個不斷重複的問題
想想你傳統的截圖工作流程:
- 你按下快捷鍵擷取
- 角落彈出縮圖
- 你點擊縮圖(或開啟 App)
- 標註編輯器在新視窗中開啟
- 你找到工具、選擇顏色、畫箭頭
- 儲存或複製
每個循環大約需要 15–20 秒。聽起來不多,但如果你一天截 30 張圖,那就是將近 10 分鐘花費在單純等待視窗開啟上。
更重要的是:每次切換上下文都迫使你重新載入專注狀態。你正專心除錯,發現了一個 bug,把它擷取下來 — 然後被拉進另一個視窗。等你回來,那個 bug 可能已經捲走了,或者你忘了接下來要做什麼。
什麼是 Capture Markup?
Capture Markup(也稱為 Inline Area Annotate)讓你在選擇螢幕擷取區域時,直接在覆蓋層內新增標註。
不再:
擷取 → 開啟編輯器 → 標註 → 儲存
而是變成:
擷取 + 即時標註 → 儲存

在擷取覆蓋層內,拖曳選取後,工具列會直接出現在選取區域的上方。你可以:
- 畫箭頭指向重要的細節
- 新增文字做快速說明
- 畫矩形或圓形框住 UI 元素
- 重點標示程式碼區塊或按鈕
- 新增編號步驟用於教學
- 使用畫筆做手寫標記
- 復原 / 重做如果你畫錯了
所有這些都發生在你正在觀看的螢幕上。沒有新視窗。沒有轉場動畫。沒有失去專注。
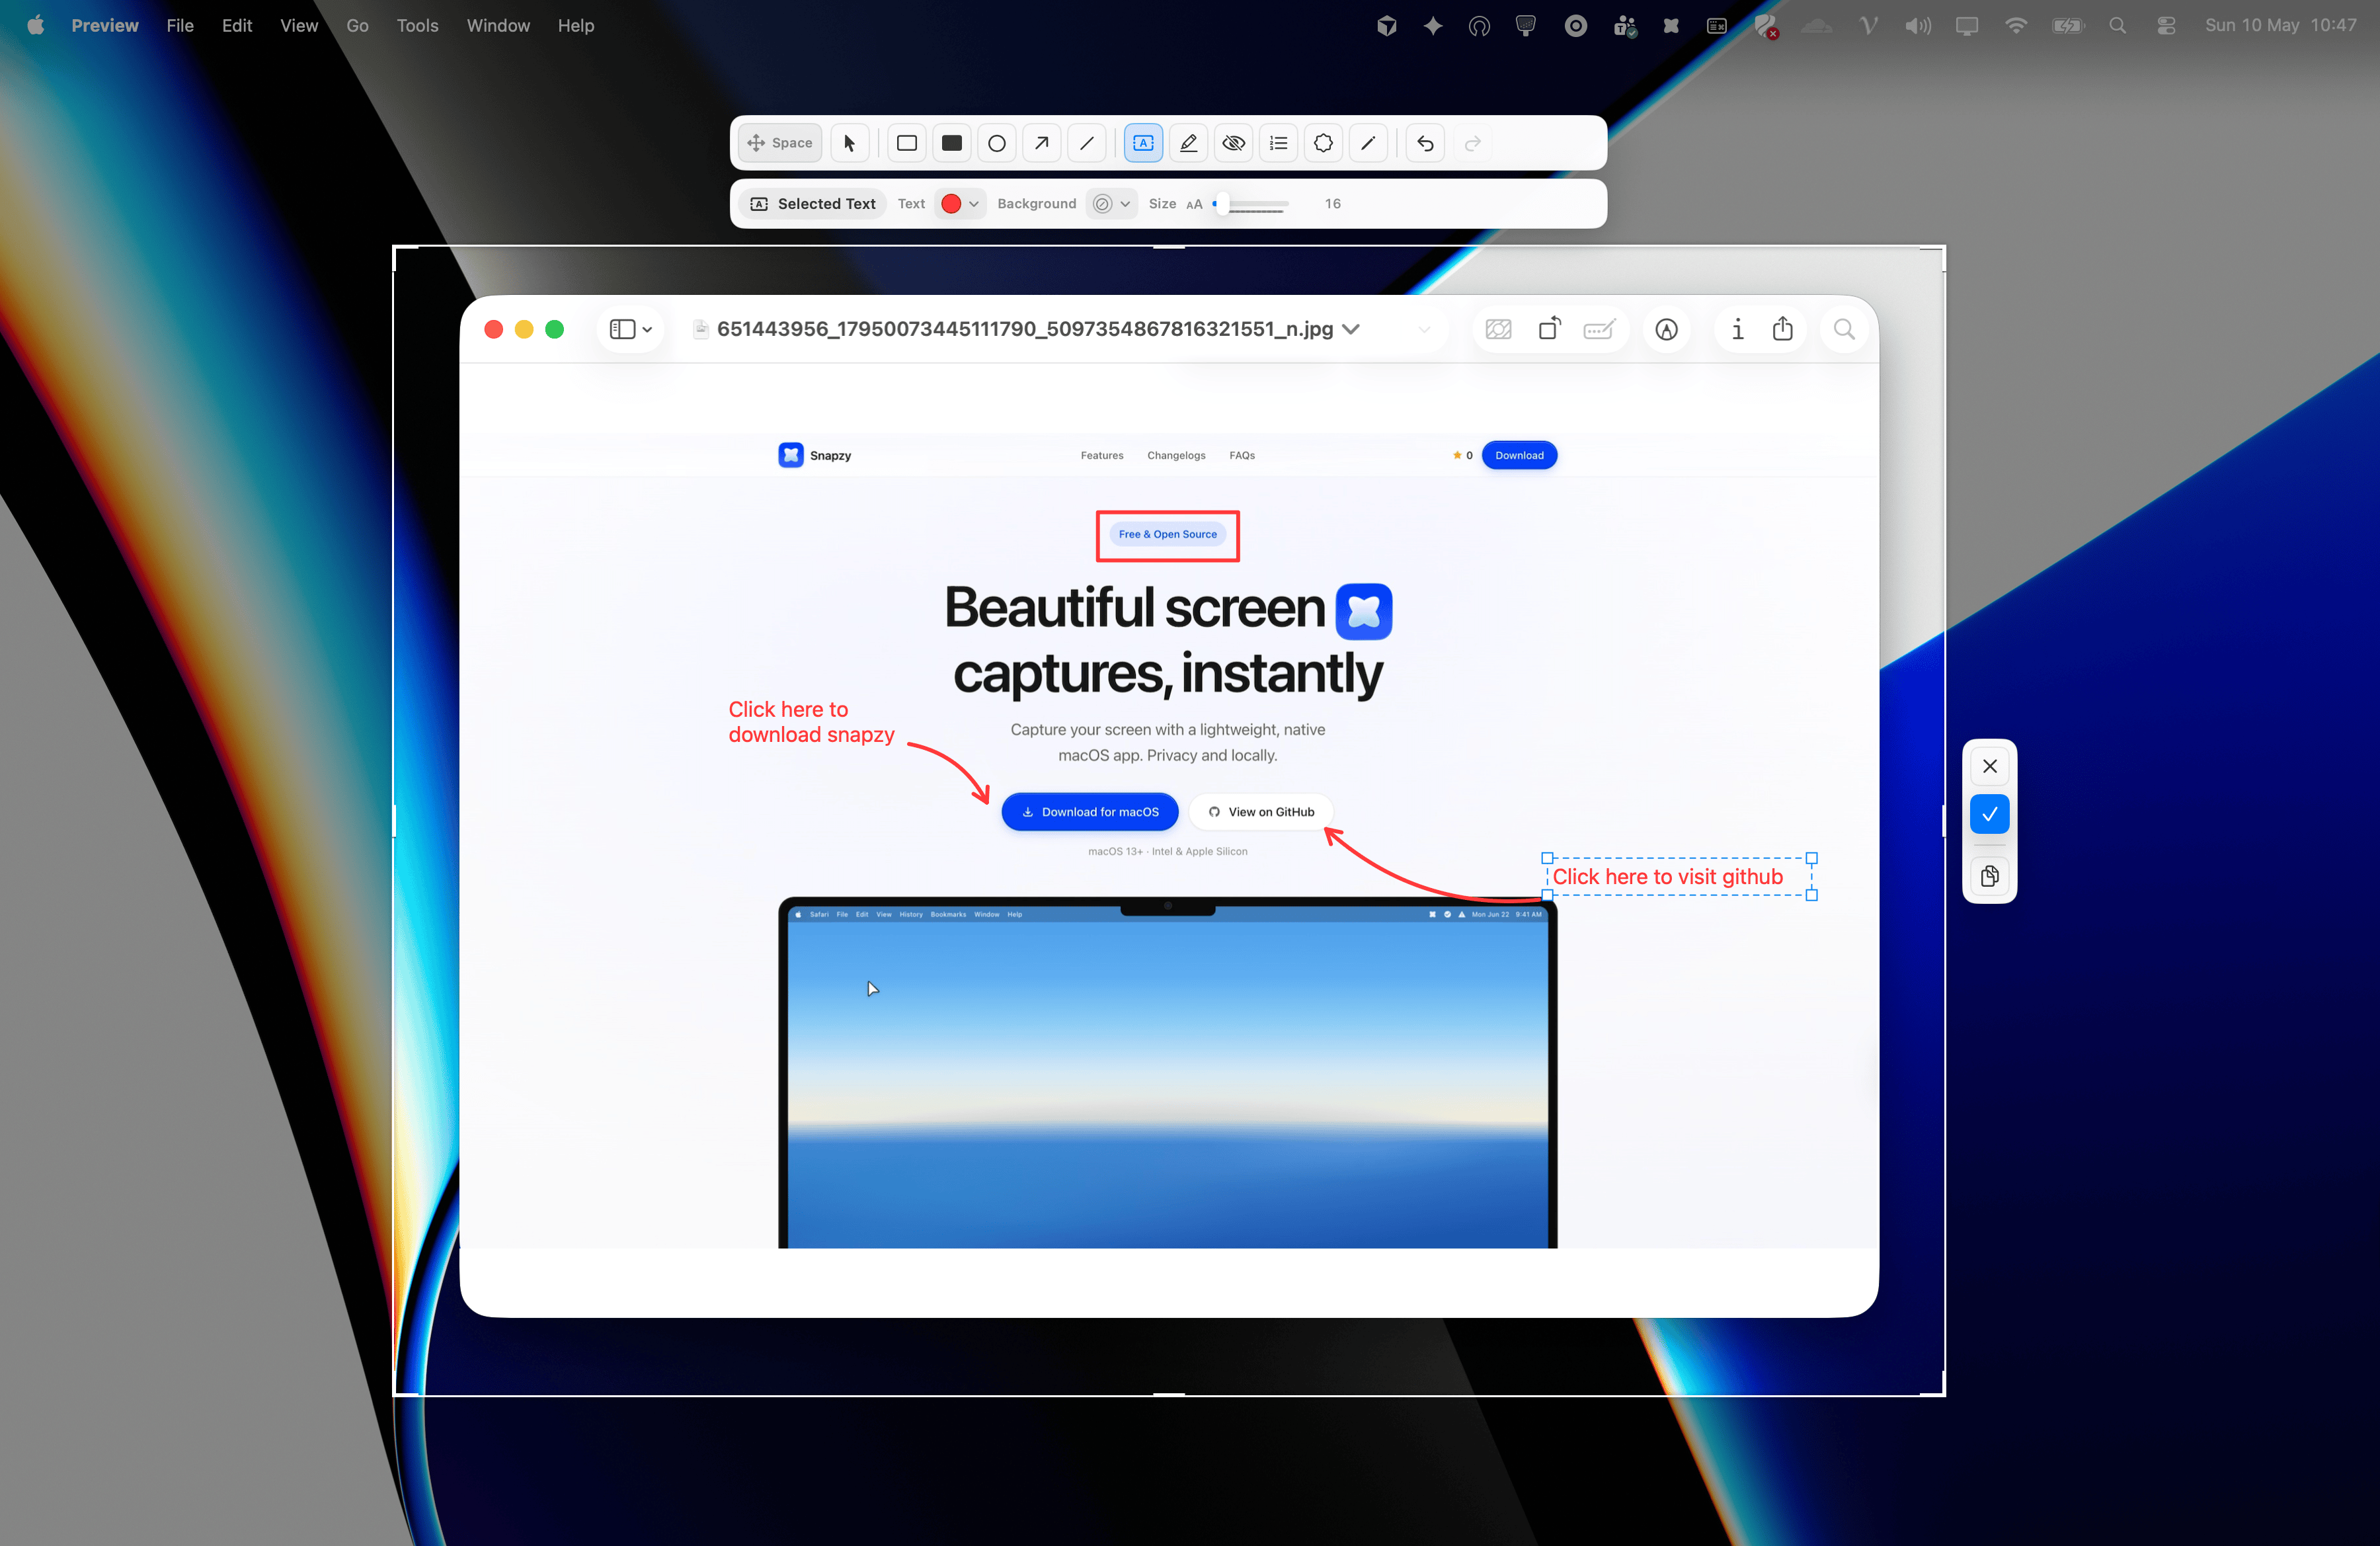
實際上看起來如何
以下是 Capture Markup 在擷取網頁區域時的真實介面:
注意:
- 工具工具列就放在選取區域的上方,簡潔而不干擾
- 屬性列顯示目前工具的選項 — 顏色、大小、背景
- 箭頭和文字標註即時繪製在截圖上
- 完成後,按 Enter 或點擊勾選按鈕 — 圖片會連同所有標註一併儲存
與其他 App 的比較
| 功能 | Snapzy (Capture Markup) | CleanShot X | Shottr | macOS 原生 |
|---|---|---|---|---|
| 在擷取覆蓋層內標註 | 是 | 否 | 否 | 否 |
| 從擷取到完成的時間 | ~5 秒 | ~15 秒 | ~12 秒 | ~20 秒 |
| 工作流程步驟 | 2 步 | 4 步 | 4 步 | 5+ 步 |
| 保持你的工作上下文 | 是 | 否 | 否 | 否 |
| 覆蓋層內復原 / 重做 | 是 | 否 | 否 | 否 |
| 覆蓋層內完整標註工具組 | 是 | 只有基本預覽 | 否 | 否 |
CleanShot X
CleanShot X 在擷取後有快速存取覆蓋層,但它主要用於預覽、複製或選擇動作(儲存、標註、上傳)。要真正標註,你仍然需要開啟獨立的標註編輯器。他們的覆蓋層看起來很棒,但它是「擷取後的控制面板」 — 不是「邊擷取邊畫的畫布」。
Shottr
Shottr 有不錯的標註工具,但完全是在擷取後使用的。你先截圖,然後圖片在編輯器視窗中開啟。擷取期間根本沒有內嵌覆蓋層。
macOS 原生
內建的 macOS 截圖工具可以透過 Preview 工具列做基本標註(如果你開啟儲存的圖片),但流程很笨拙:擷取 → 在桌面上找到檔案 → 開啟 Preview → 選擇工具。沒有覆蓋層,沒有內嵌功能。
什麼時候用 Capture Markup,什麼時候用標註編輯器
Capture Markup 不會取代完整的標註編輯器 — 它們是互補的。
使用 Capture Markup 的時機:
- 你需要快速截圖,加上幾個箭頭或簡短註解
- 你正在除錯,需要立即標記一個 bug
- 你在寫內部文件,需要簡單的步驟說明
- 你想保持在工作流程中,不打破專注
使用標註編輯器的時機:
- 你需要大量編輯:精準裁切、背景替換、浮水印
- 你要以特定畫布尺寸匯出,用於社群媒體
- 你想套用儲存的預設設定
- 你在編輯一張之前截取的圖片
Snapzy 兩者都給你。Capture Markup 追求速度。標註編輯器追求深度。
如何啟用
Capture Markup 內建於 區域擷取(⌘⇧3),從 Snapzy v1.14.0 開始提供。
使用方法:
- 按 ⌘⇧3 開啟凍結區域擷取
- 拖曳選取你想要的區域
- 標註工具列會自動出現在選取區域上方
- 選擇工具並直接在覆蓋層上開始繪製
- 按 Enter 或點擊勾選按鈕儲存
- 圖片會複製到剪貼簿(或儲存為檔案,視你的設定而定)
如果你在某次擷取中不想使用 Capture Markup,直接忽略工具列 — 選取區域後立即按 Enter,截圖就會正常儲存。
總結
Capture Markup 改變了你對截圖的思考方式。它不再是「先擷取再修正」 — 而是「擷取和修正同步完成」。
用其他 App,擷取和標註之間總是有一段差距。用 Snapzy,那段差距消失了。
如果你還沒更新到 v1.14,開啟 Snapzy 檢查更新。這項功能是免費的,就像 Snapzy 中的所有其他功能一樣。